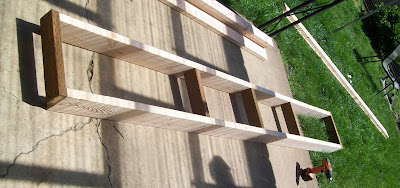
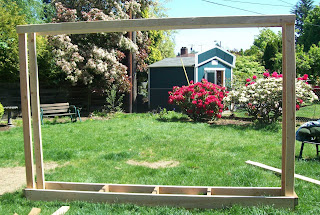
 After a Memorial Day of wood chopping we needed somewhere to put up all the wood to dry and be stored for this fall/winter when we are going to need it to heat the house. So Family Day became a trip to Home Depot and building of firewood racks. This project is incredibly simple and I dare say that I could have done it myself. One person can easily take the project on by themselves with the help of a lovely assistant to support and carry large objects only a couple of times.
Our racks were constructed to fit just about a full chord of wood. A full chord is 128 cubic feet. This basically means the length, height, and width of your rack needs to multiply together to make 128. We used the dimensions of our covered back patio to figure out how big we wanted to make our racks, and they fit just under a full chord of wood. (It will take about one and a third racks to equal a full chord.) However, we have a smaller rack which was previous made by Jules to accommodate the extra.
We did not use pressure treated wood because we designed the racks to fit under our patio which is covered and doesn't receive much of any rain. If the racks are going to be exposed to any elements or merely covered with a tarp, pressure treated wood is a must. This will increase your initial costs by maybe $15, but will mean you don't have to replace your rack year after year.
Materials
2 2x6x10 boards
2 2x4x10 boards
6 2x4x8 boards
1 box of 3 inch wood screws
Total Cost 26.50
Tools
Power drill with Phillips head bit and pilot hole bit
Miter saw (or a protractor and a pencil)
Power saw
measuring tape
None of these tools is absolutely necessary, all can be improvised or used with manual power, but these tools make it so much quicker and so much easier. More power to anyone who would do this without the above tools. You are significantly more simplistic that we are and that is awesome.
Directions
First we constructed our base. Cut 6 sections of 2x4 (use the eight footers), each 15 inches long. Create a rectangle using 2 of the 15inch sections on each end and the 2x6 boards for the sides. The other four sections of 2x4 you will be using in a minute.

With the base now complete, it is time to construct the top and arms of the rack. Set the base aside and prepare some ample space to lay out the rest of the rack. Cut 4 sections of 2x4 (again the eight footers) each 6 feet long. These will be the arms of the rack. Save the left over two foot sections as they will become support beams.
We laid out each arm separately, and then fastened the arms to the base one at a time. Mainly this was due to just how large and difficult to move both arms would be attached together. Screw one of the 6 foot sections you just cut onto the end of one 2x4x10 inch board. Screw the other 6 foot section to the other end of the 2x4x10 making a very large U shape. With the aide of a lovely assistant, carry the U shaped arm out to the base and attach it to the inside corners of one side. Notice that the top 2x4x10 is facing out and the beams were screwed on the inside of the base. This alternating provides more stability for the structure.


When all four board are cut, place them directly opposite from the corner created by the base and the side arm. This should create a right triangle. (Flash back to sophomore geometry!)
With racks built we ventured into our local National Forest and came home victorious with truckloads of split firewood. The Spicy Barracuda gladly helped me stack it; growing in excitement as he watched the stack get bigger and bigger and the rack get fuller and fuller. Now we have almost an entire rack of wood ready and waiting for the winter. Not only is there a significant feeling of accomplishment (and great exercise) when you are chopping the wood, but stacking it all up adds a finality to the whole process. You can sit back and view your work in a concrete product as well as knowing you are securely warm without aide of the Natural Gas company.
main |
sidebar
Rock Your Authenticity!
Pages
Popular Posts
Blogger templates
Blogger news
featured-content
Contact Information
ShareThis
Friday, May 29, 2009
Firewood Racks
at Friday, May 29, 2009
Subscribe to:
Post Comments (Atom)
My Current Mantra
"...It is necessary now and then for a man to go away by himself and experience loneliness, to sit on a rock in the forest and ask of himself, ‘Who am I, and where have I been, and where am I going?’ ”
~Carl Sandburg
Blogroll
Designed by SkinCorner Free Blogger Templates | Sponsored by Stylistbackgrounds | Illustration by Dream of Echi


3 thoughts:
Great detail and excellent description. Good job posting this for all to see and use!!!!
Thanks, really helpful.
I built two racks together as one unit side by side and it greatly increased stability (even at 8' tall). Simple to do, just make the spacers on the bottom and the 3 pieces on each end longer to tie the two racks together, then one across the top mid-span.
Post a Comment