Last year, I attempted some seed sprouting. Hah! It was quite a significant failure. I figured that the seeds could do it all by themselves in the Spring time, why couldn't I do it inside. After all, they knew what they needed to do.
Well, yes. The seeds sprouted beautifully, then got really leggy and died. This year, we kicked it up a notch and put the seed starting squarely in the hands of The Barracuda. He gladly gave away his television in trade for being able to sprout our seeds.
Humbled by my complete failure, I began to read up. "Leggy" is what they call my dead sprouts. This means that the stem is too long and the plant gets top heavy. As the seed strains for light, it is undernourished and doesn't produce secondary leaves. Dead Plant.
The remedy is simple: more light. LOTS more. Complete, all-encompassing, intense light submersion. This is what grow lights are for. They give the plant strong light so that it doesn't have to over-extend itself. This makes for a strong stem, early secondary leaf production, and a really hearty start to its little life. All that light also warms the soil allowing the seeds to sprout sooner, also yielding larger plants when it is time to put them outside.
I had heard of grow lights, but figured them to be extravagantly expensive. I thought they were fancy lights with special seed starting capabilities which mimicked super specific sunlight conditions. Um, no. They are just lights. Normal, right out of your bedside lamp, lights. Completely normal, only they need to hang down REALLY close to the plant. Determined not to kill things this year, it was off to Home Depot.
The entire set up was $40 and puts out 300 watts of light. This was more than enough for our seed tray. By purchasing swankier light bulbs (which made us look even more like we were growing illicit drugs) the output could have been 450 watts. The energy efficient light bulbs were by far the most expensive part.
There are three parts to making the grow lights. Each is simple, straight forward and easy enough for even someone like me to pull off without a trip to the emergency room. Keep in mind this was what worked for us.The design could easily be modified to fit a production either larger or smaller than ours. Just remember: For every light, you need one clamp.
The Platform
1 board any size that is large enough
1 1/8 inch drill bit and the drill to go along with it
1/2 inch drill bit
4 3/4 inch U pipe bends
A hammer
Directions
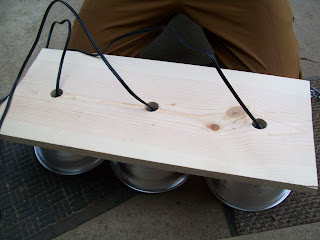
Set the board down and line up the lights as you would like them to be. Trace the outline of ht lights and cut the board to fit, creating a rectangle.
Use a ruler to find the middle of each light and mark it with a big X.
Place a 1 1/8 inch drill bit in the center of the x and drill your hole for each light.

Remove the U from 4 U-bends (Keep all the extra parts, you’re going to need them). In each corner align one of the U's facing down about a ½ inch from the edges. Now, whomp the U bend really hard with a hammer to make the impressions of the legs. Using a ½ inch drill bit, drill holes straight through the board where the impressions were made. Pound the U bend through the holes (it should be really tight) with the help of a hammer and secure with nuts. These are the brackets from where you will suspend the grow lights.
The left over pieces from the U bends
The 2 remaining intact U bends
6 1/4 inch bolts
Directions
The clips are what hold the lights in place, but also allow you to easily adjust the height to which each individual lamp is raised. This is helpful when you have multiple varieties of seeds you are trying to start. Celery, for example, takes up to three weeks to germinate. The lights need to be extremely close to the soil for the entire time. If you are growing tomatoes in the same seed tray, they germinate in a week and need the lights to be raised when they sprout. By using the clips, the platform can be raised for tomatoes, and one light can remain lower for the celery.
Take apart the remaining 2 U bends. Set aside the U's as you do not need them.
Slip 2 of the flat pieces from the U bends onto two 1/4 inch bolts and secure with nuts.
 You will need one clip for each light, so adjust amounts accordingly.
With those pieces assembled, you are now ready to construct the rest of the grow lights. Take the clamps off of the aluminum lights. They usually unscrew very easily. Thread the power cords of the lights up through The Platform, making sure the arch of the U’s is facing the ceiling. Fix one Clip to each light’s cord as close to the base of the board as possible. The Clip should fit snugly, but not pinch or cut the cord.


You can now hang your completed grow lights wherever suites your house. In our house, an old end table replaced our son's movie television and now houses the seed starting. He is very proud of his "grow lights" turning them on every morning when he wakes up and off every evening before he goes to bed. It is the a great way to teach our son responsibility without too much by way of disastrous consequences. Secondly, science couldn't be much more hands on. Not only is the seed starting a great addition to our household, but a great addition to homeschooling as well.


0 thoughts:
Post a Comment